Does anyone else have a problem with losing receipts? Have you stuffed a receipt in your pocket or purse, never to be found again?
Maintaining your receipts in an organized fashion is important for many purposes, such as making a warranty claim or preparing your taxes. Scanning receipts and saving them to Google Drive can make tracking receipts easy.
Which Receipts to Scan
I have gotten into the habit of immediately scanning in all of my business-related receipts using my smartphone so I’m prepared when tax time rolls around. However, you can (and should) scan receipts for more than just business expenses.
Read more: A Small Business Owner’s Bookkeeping Checklist
We like the Fujitsu ScanSnap scanner to scan tax receipts and medical receipts for HSA claims. This is a good place to start when deciding which receipts to scan.
You should also consider scanning receipts for big-ticket items, such as computers, electronics, or household appliances. A copy of a receipt is essential when it comes to warranties, rebates, returns, and accidental damage policies.
Here’s one more tip: scan all your Costco receipts in case you need to use their extremely lenient “lifetime return policy.”

How to Scan Your Receipts Using Your Android Device
Requirements: You will need a Google account and the Google Drive Android app installed. Here are the official instructions.

- Open the Google Drive App.
- Click on the “+” Button on the lower right-hand corner, and select Scan.
- Press the Blue Button to capture an image using your smartphone’s camera, preferably on a contrasting surface.
- You may crop your image by dragging the blue dots to properly outline your receipt. When you’re satisfied with your outline, press the Check button.
- If you’d like to rename your document, press on the default Scanned_....pdf file name. When you’re finished, press the Check button.
Sorry iOS users, this feature is only available on Android, but you can use this alternative to import your scanned receipts into Google Drive.
Saving Receipts to Your Desktop
I make the majority of my online purchases on my desktop computer, and while I can usually retrieve receipts from either the retailer’s website or from an e-mail, I still save an additional copy on Google Drive. By having all of my receipts centralized in Google Drive, I won’t have to search through e-mails or my order history on Amazon to find a certain one. I can simply go to my Google Drive and easily find what I need.
How to Save Your Receipts Using Your Desktop Chrome Browser
- Immediately after you make a purchase, click on Print or hit Ctrl + P. You will not print a physical copy; you will be printing directly into Google Drive.

- Change your Printer Destination.

- Select Save to Google Drive.
- You may Rename the file by clicking on Change printer options...

- Click on Save to save to Google Drive. This will save the receipt as a PDF file.
Two Tips on Organizing Your Receipts
After you get in the habit of saving receipts, you’ll need a good system to keep your Google Drive files organized. There’s no right or wrong way to organize your receipts!
Here are the two things you can do to help with your organization:
1. Keep a consistent naming scheme
Keeping a consistent naming template for your files will allow you to easily search and skim through your files. Here is how my scanned files are named:
YYYY.MM.DD - Company - Item - Note (optional)
Examples:
2020.05.11 - Amazon - Toshiba Chromebook - i3 CPU
2021.03.15 - Costco - Sharp TV - Model 70LE660U
Naming your files may take a few extra seconds of time, but the organization will pay off in the future when you need to quickly locate a receipt to make a warranty claim or need to prepare your taxes.
2. Use Folders
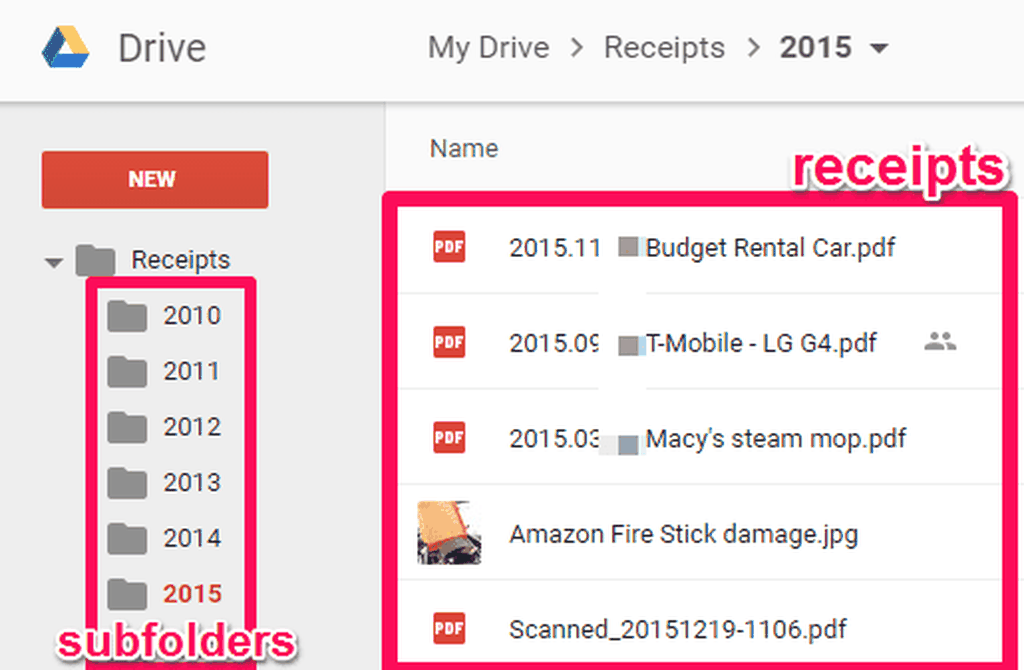
You can use folders to organize by category, store, or date. Decide what works best for you. Keep your folder names concise, and try not to go crazy with those subfolders! I'd recommend starting with these two folders each year:
- 2021 Personal
- 2021 Business
This will keep your Google Drive folders down to a manageable size. When you start doing this for a few years, it will look something like this:

Bonus Tips
- You can create an Android widget on your home screen to access Google Drive’s scanning tool in one touch. Click on the Add a scanning shortcut to your home screen section on Google’s official guide to find out how.
- Don’t scan everything. Think about what you actually need: business receipts, HSA receipts, and/or big-ticket items. If it doesn’t fit into those categories, do you really need to scan it?
- Supplement your receipts with pictures. Working in the medical industry for over a decade has taught me the importance of documentation. When I rent a damaged rental car, I’ll take a picture and store it next to the rental receipt in Google Drive before I drive off the lot. If I receive a damaged item in the mail, I’ll usually take a picture of the damaged product and store it with the same file name as the receipt.
- Use your scanner. Most new scanners and multi-function printers come with a feature to scan directly into your Google Drive. As a bonus, most higher-end scanners will offer OCR, which converts the text in your receipts into searchable text in Google Drive. This defeats the need for the additional step of renaming your scanned file and allows for true one-touch scanning. This is a perfect solution for multi-page receipts. Consider investing in one of these scanners if you’re constantly adding new receipts to your files.
With Google Drive and a small change in my habits, I no longer have to worry about losing receipts. Storing receipts on Google Drive does take a bit of getting used to, but once you get the hang of it and your “to file” pile begins to disappear, you’ll realize that extra bit of time is worth it for peace of mind.


